
HOW TO: Image transformation with gestures in Xamarin
![]()
![]()
Nowadays, stickers are a must-have feature for the modern mobile camera applications. They provide the users with the opportunity to share their emotions that they have felt while taking the photo. A heart on a photo with a loved one, a glass of beer on the photo from a Friday’s party or a sticker with the location of the Saturday’s festival – with those we can say much more than with just two or three words.
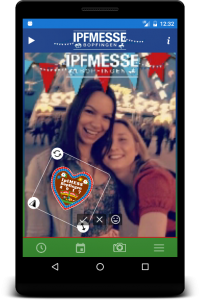
Typical interactions with the stickers are to scale them up or down, to rotate them or to move them to the preferred spot on the picture. A well-known layout for the app-users is the sticker to be put in a frame, on which the interaction spots or buttons are located (see Figure 1).
In this article:
What are the challenges behind its development?
However, there are some challenges for the developers, which cost time and money, although the functions are rather typical nowadays. There are challenges mostly by Xamarin, which enables the development of Cross-Platform Native Applications. To be precise, there is no suitable library in Xamarin for this task. A lot should be programmed by hand and problems, that were already dealt with by others, should be solved once more by the developer.
What is missing in Xamarin?
The app-developer should implement a lot, starting with the sticker frame up to the interaction gestures, native in iOS or Android with the so-called Custom Renderers, because the needed features are missing at this time in Xamarin.Forms.
> Interaction Gestures
At the moment, Xamarin.Forms supports only the Tap, Pinch and Pan gestures. Unfortunately, those are not exactly suitable for the sticker interaction. However, what can be done, is to alter the logic behind the available gestures, so that Pan can be used instead of Drag&Drop, for example. The other possibility is to write Custom Renderers und thereby, to implement the gestures native in Android and iOS. Here you can find yourself before an obstacle, as well, when the needed classes are missing in Xamarin.Forms. Then, you can write a converter that transforms a Xamarin.Forms element into an Android one. A third possibility is to use bitmaps and matrices but it should be done separately in Android and iOS. In such case, the developer should keep in mind the differences in the density and in the position between the displayed and actual image, while writing the needed formulas.
We have chosen the first possibility, for it provides a cross-platform solution and is simpler in the case of a Xamarin.Forms project.
For the flip functionality, we have used a TapGestureRecognizer and the implementation itself is rather uncomplicated.
//Transformation Variables public int flipDeg = 0; ////// Flip the sticker, when the flip button is clicked. /// /// The clicked button. /// The tap event. async void FlipOnTapGestureRecognizerTapped(object sender, EventArgs args) { if (flipDeg == 0) { flipDeg = 180; sticker.RotateYTo(180); } else { sticker.RotateYTo(0); flipDeg = 0; } }
Figure 2: Flips Gesture Implementation
Users want to resize their stickers in order to achieve that we have used a PanGestureRecognizer.
//Transformation Variables public double scale; ////// Resizing the sticker. /// /// The clicked button. /// The pan event. async void OnResize(object sender, PanUpdatedEventArgs e) { switch (e.StatusType) { //"PanContainer" is a RelativeLayout, used for the resizing, which contains another //RelativeLayout("relativeToTransform"), used for the rotating, which in its place //contains the CustomFrame with the sticker. case GestureStatus.Running: var deltaX = e.TotalX - PanContainer.X; var deltaY = e.TotalY - PanContainer.Y; var newWidth = PanContainer.Width + deltaX; var newHeight = PanContainer.Height + deltaY; scale = Math.Min(Math.Max(Math.Min((newWidth / PanContainer.Width), (newHeight / PanContainer.Height)), 0.5), 1.5); PanContainer.ScaleTo(Math.Min(Math.Max(Math.Min((newWidth / PanContainer.Width), (newHeight / PanContainer.Height)), 0.5), 1.5)); break; case GestureStatus.Completed: scale = sticker.Scale; break; } }
Figure 3: Resize Gesture Implementation
To match the scenery of a picture, a user wants to rotate his stickers for that we have also used a PanGestureRecognizer.
//Transformation Variables public double rotateDeg; public bool rotated = false; ////// Rotating the sticker. /// /// The clicked button. /// The tap event. async void OnRotate(object sender, PanUpdatedEventArgs e) { switch (e.StatusType) { //"relativeToTransform" is a RelativeLayout used for the rotating, which //contains the CustomFrame with the sticker. case GestureStatus.Running: rotated = true; relativeToTransform.RotateTo(e.TotalX); rotateDeg = relativeToTransform.Rotation; break; case GestureStatus.Completed: rotateDeg = relativeToTransform.Rotation; break; } }
Figure 4: Rotate Gesture Implementation
For the dragging functionality, we have also used a PanGestureRecognizer. For the implementation, the developer should check if the image has been flipped or rotated and use this information in the formula for the movement.
//Transformation Variables public double x; public double y; public double dx; public double dy; ////// Moving the sticker. /// /// The clicked button. /// The tap event. void OnMove(object sender, PanUpdatedEventArgs e) { switch (e.StatusType) { case GestureStatus.Running: if (flipDeg == 0) { if ((rotateDeg > 50 && rotateDeg < 120) || (rotateDeg < -240 && rotateDeg > -310)) { dx = y + e.TotalY; dy = x + e.TotalX; stackPhoto.TranslateTo(-y - e.TotalY , x + e.TotalX , 100); }else if ((rotateDeg < -50 && rotateDeg > -120) || (rotateDeg > 240 && rotateDeg < 310)) { dx = y + e.TotalY; dy = x + e.TotalX; stackPhoto.TranslateTo(y + e.TotalY, -x - e.TotalX, 100); } else if ((rotateDeg > 120 && rotateDeg < 240) || (rotateDeg < -120 && rotateDeg > -240)) { dx = -x - e.TotalX; dy = -y - e.TotalY; stackPhoto.TranslateTo(-x - e.TotalX, -y - e.TotalY, 100); } else { dx = x + e.TotalX; dy = y + e.TotalY; stackPhoto.TranslateTo(x + e.TotalX, y + e.TotalY, 100); } } else //flipped { if ((rotateDeg > 50 && rotateDeg < 120) || (rotateDeg < -240 && rotateDeg > -310)) { dx = y + e.TotalY; dy = -x - e.TotalX; stackPhoto.TranslateTo(-y - e.TotalY, -x - e.TotalX, 100); } else if ((rotateDeg < -50 && rotateDeg > -120) || (rotateDeg > 240 && rotateDeg < 310)) { dx = y + e.TotalY; dy = -x - e.TotalX; stackPhoto.TranslateTo(+y + e.TotalY, +x + e.TotalX, 100); } else if ((rotateDeg > 120 && rotateDeg < 240) || (rotateDeg < -120 && rotateDeg > -240)) { dx = x + e.TotalX; dy = -y - e.TotalY; stackPhoto.TranslateTo(x + e.TotalX, -y - e.TotalY, 100); } else { dx = -x - e.TotalX; dy = -y + e.TotalY; stackPhoto.TranslateTo(-x - e.TotalX, y + e.TotalY, 100); } } break; case GestureStatus.Completed: // Store the translation applied during the pan x = stackPhoto.TranslationX; y = stackPhoto.TranslationY; break; } }
Figure 5: Drag&Drop (Move) Gesture Implementation
> Sticker Frame
This kind of frame is well-known from a lot of applications and dominates over all other alternaves like the Multi-Touch Gestures. The reason for this is that thanks to the frame, it is clearer to the user how to interact with the sticker and namely – to use the corresponding buttons.
The first idea that comes to a developer in such a situation is to use the Frame class, included in Xamarin.Forms. However, it functions not exactly as needed in this case. Therefore, we have created a renderer (see Figure 6, Figure 7, Figure 8, Figure 9).
////// Custom Frame to display white borders around image. /// namespace IpfMessApp.Controls { public class CustomFrame : Frame { } }
Figure 6: Custom Frame in the Cross-Platform Project
class CustomFrameRenderer : FrameRenderer
{
    protected override void OnElementChanged(ElementChangedEventArgs e)
    {
        base.OnElementChanged(e);
        if (e.NewElement != null)
        {
            if (!PhotoEditPage.instance.StickerFrame.BackgroundColor.Equals(Color.Transparent))
            {
                    ViewGroup.SetBackgroundResource(Resource.Drawable.shadow); //see Figure 8

            }
        }
    }
}
Figure 7: Custom Frame in Android (1)
Figure 8: Custom Frame in Android (2) – shadow.xml
class CustomFrameRenderer : FrameRenderer
{
    protected override void OnElementChanged(ElementChangedEventArgs e)
    {
        base.OnElementChanged(e);
        if (Element != null)
        {
            this.Layer.BackgroundColor = Color.Transparent.ToCGColor();
            Layer.BorderColor = UIColor.White.CGColor;
            Layer.BorderWidth = 1;
        }
    }
}
Figure 9: Custom Frame in iOS
> Saving the image with the sticker
Here we also have some possibilities to choose from. One is to use once more Custom Renderers and to save the photo together with the sticker as one image by using the classes Bitmap and Canvas. An alternative, which we have chosen, is to make a screenshot of the needed part of the app screen and save it as a bitmap. This should also be done in Android as well as in iOS separately (see Figure 10, Figure 11).
double drawLeft; double drawTop; ////// Calculates the space left on the top and on the left in the /// ImageView, when an image/photo is displayed. /// public async void calculateRatioAsync() { Bitmap photo = null; using (var bitmap1use = await GetBitmapFromImageSourceAsync(PhotoPage.instance.PhotoImage.Source, MainActivity.context)) { photo = bitmap1use.Copy(bitmap1use.GetConfig(), true); } Image imageView = PhotoPage.instance.PhotoImage; double bitmapRatio = ((double)photo.Width) / photo.Height; double imageViewRatio = ((double)imageView.Width) / imageView.Height; double drawHeight; double drawWidth; if (bitmapRatio > imageViewRatio) { drawLeft = 0; //Height of the bitmap displayed drawHeight = (imageViewRatio / bitmapRatio) * imageView.Height; drawTop = (imageView.Height - drawHeight) / 2; } else { drawTop = 0; //Width of the bitmap displayed drawWidth = (bitmapRatio / imageViewRatio) * imageView.Width; drawLeft = (imageView.Width - drawWidth) / 2; } }
Figure 10: Calculating the left space around the photo in the ImageView (Android).
var view = Activity.Window.DecorView;
view.DrawingCacheEnabled = true;

DisplayMetrics dm = MainActivity.context.Resources.DisplayMetrics;
float densityDpi = dm.Density;

TabNavPage mainPage = (TabNavPage)App.Current.MainPage;

int statusBarHeight = 0;
int resourceId = MainActivity.context.Resources.GetIdentifier("status_bar_height", "dimen",
                                                              "android");
if (resourceId > 0)
{
    statusBarHeight = MainActivity.context.Resources.GetDimensionPixelSize(resourceId);
}

Rectangle rect = mainPage.pagesCarousel.Bounds;

int width = Convert.ToInt32(rect.Width * densityDpi - drawLeft * 2* densityDpi);
int height = Convert.ToInt32(rect.Height * densityDpi - drawTop * 2* densityDpi);
int X = Convert.ToInt32(rect.X * densityDpi + drawLeft * densityDpi);
int Y = Convert.ToInt32(rect.Y * densityDpi + statusBarHeight + drawTop * densityDpi);

Bitmap bitmap = view.GetDrawingCache(true);
Bitmap croppedBitmap = Bitmap.CreateBitmap(bitmap, X, Y, width, height);

byte[] bitmapData;

using (var stream = new MemoryStream())
{
    croppedBitmap.Compress(Bitmap.CompressFormat.Png, 0, stream);
    bitmapData = stream.ToArray();
}
Figure 11: Getting a bitmap array of the needed area (Android)
In iOS the calculations of the space around the photo are very similar to those in Android (Figure 10). The code for generating a bitmap has some specifics, however (see Figure 12).
var view = UIApplication.SharedApplication.KeyWindow.RootViewController.View;
TabNavPage mainPage = (TabNavPage)App.Current.MainPage;
Rectangle rect = mainPage.pagesCarousel.Bounds;

float statusBarHeight = (float) UIApplication.SharedApplication.StatusBarFrame.Height / 2;
float dpiScale = (float) UIScreen.MainScreen.Scale;

int width = Convert.ToInt32(rect.Width * dpiScale - drawLeft * 2 * dpiScale);
int height = Convert.ToInt32(rect.Height * dpiScale - drawTop * 2 * dpiScale);
int X = Convert.ToInt32(rect.X * dpiScale + drawLeft * dpiScale);
int Y = Convert.ToInt32((rect.Y + statusBarHeight + drawTop) * dpiScale);

UIGraphics.BeginImageContextWithOptions(view.Frame.Size,view.Opaque,0.0f);
view.DrawViewHierarchy(view.Frame,true);
UIImage image = UIGraphics.GetImageFromCurrentImageContext();
UIGraphics.EndImageContext();

CGRect cgRect = new CGRect(X,Y,width,height);

CGImage croppedImage = image.CGImage.WithImageInRect(cgRect);
image = new UIImage(croppedImage);

using (var imageData = image.AsPNG())
{
    var bytes = new byte[imageData.Length];
    System.Runtime.InteropServices.Marshal.Copy(imageData.Bytes, bytes, 0,
    Convert.ToInt32(imageData.Length));
}
Figure 12: Getting a bitmap array of the needed area (iOS)
Conclusion
A lot of developers ask in the Xamarin forums – why is there still no official library for this, when it is such a widespread functionality. Well, maybe we will see one soon.
And for the time beeing, feel free to use this code and leave your ideas in the comments!